8 Ways to Choose The Right Office Partition


Choosing the right office dividers might be a challenge.

Flexible office space is made possible by office partitions, which may be found in the majority of today’s corporate workspaces as well. When it comes to creating a welcoming work environment, selecting the proper partitions is critical due to the significant impact they have on employee well-being and efficiency on a daily basis. To put it another way, a workplace with badly designed and colored dividers is more likely to be chaotic and stressful.


As a result, how can we determine which partitions are most suited for our workplace and staff?

We’ve put up a simple tutorial below to answer your questions.

1. Be aware of your alternatives.

The following are some of the most frequent forms of office partitions:

Cubicles

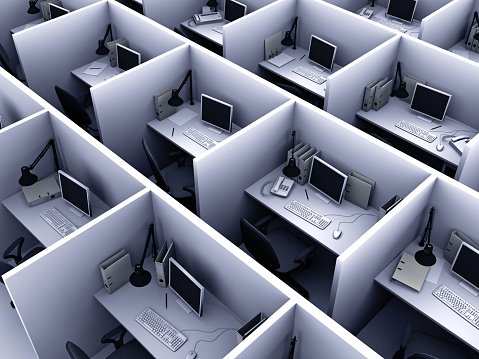
Employees work in a box-like space in cubicles, the most prevalent style of office divider. It’s no longer uncommon to see desks that can be adjusted in height, extended arms, and monitor stands in cubicles nowadays.

Accordion-style walls

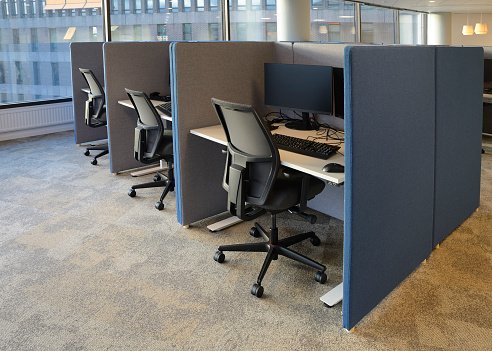
As a floor-to-ceiling office separation, accordion walls or flexible panel walls are a common choice. Accordion walls may be readily moved and rearranged in various ways to provide the space and privacy you want as required.

dividers made of wood or timber

Wood dividers might be an appealing and classic option if you’re remodeling your permanent office space. For a quieter work atmosphere, wooden or timber dividers are excellent.

partitions of glass


Even though they don’t provide as much privacy, glass dividers are a stylish, minimalistic option for your home’s decor. Reduced noise and natural light are also provided by these partitions, which don’t need any artificial illumination during the daylight hours.

2. Create a spending plan

With some of these possibilities in mind, it’s time to finalize your spending plan. For example, if you have a permanent office location with no intentions to transfer, you may choose to invest in more durable materials like glass or wood for your dividers. The second option is a cost-effective, quickly installed, and removable partition solution if you want to transfer your business in the future.. Don’t start shopping until you’ve decided on a budget based on the things your workplace really requires.

Don’t compromise on privacy or noise reduction if you can help it

A peaceful, distraction-free work environment with privacy and individual space is essential. Ensure that each employee has enough noise reduction and space to work when designing your partitions. Floor-to-ceiling glass and wood barriers are excellent options for separating work areas, meeting rooms, and other task-specific activities.

Consider the possibility of modifying the design.

To many people’s surprise, office walls have a significant impact on the overall appearance of an office space. It is possible to combine office partitions into your current setup with a wide range of options, components, materials, styles and patterns. Modern cubicles in the colors of your company’s logo, for example, might be used to split a bigger area. Smaller offices, on the other hand, will benefit from folding panel walls with movable storage compartments. Make the areas of your office stand out by utilizing pictures, patterns, and colors.

Focus on how easy it is to maintain.

Some office divider materials may be more suited than others for your specific interior layout. For example, glass or polycarbonate partition material is preferable than other materials in terms of separating the office kitchen or lunchroom. Wood or timber materials, on the other hand, are more suited for high-traffic areas.

Ensure that your natural lighting is not overshadowed by partitions.

Another important aspect in keeping workers happy and productive is natural light, which may induce eye strain, headaches, and stress if used for lengthy periods of time. To avoid obstructing natural light sources, we recommend employing dividers in an unobtrusive manner. Making the room seem larger by doing so will also assist.

7. It’s usually a good idea to be able to move things about.

Changing the look and feel of a room may be as simple as moving partitions from one location to another. If this is a common practice at your workplace, consider employing modular panels or accordion walls, which are both lightweight and easily transportable. It is possible to acquire a variety of modern-looking portable panels on the market.

Commercial fit-out businesses might be contacted for assistance.

enlist the help of a team of fit-out specialists

Our recommendation is to speak with specialists in the field for custom-made, high-quality commercial fit-out partitioning and installation. Using a professional means that you will get a distinctive design and the best use of your office space possible.

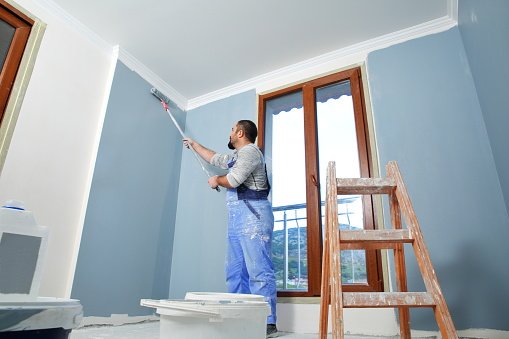
The importance of office partitions in today’s workplace culture and atmosphere has been repeatedly emphasized throughout this essay. Lucky Painting Company in Calgary offers decorating and painting services for people who want a unique work environment. Call Us today to get a free estimate.

Best Ways to Clean Your Home after Drywall Installation

Best Ways to Clean Your Home after Drywall Installation

Best Ways to Clean Your Home after Drywall Installation
Vacuum cleaner in action after drywall installation

Taking everything out of the room will serve as a good starting point if you’re looking for the best ways to clean your home after a drywall installation. Even if this isn’t feasible, you can protect the furniture from dust by covering it with plastic wrap and taping up all the corners.

Now coat all the floor surfaces, including vents and doorways. Make careful you use painter’s tape to seal the edges of any plastic. A large overlap is required when plastic components come together.

If you’re going to be doing a lot of drywall work, you may want to look into getting a dust containment entryway that zips up. The entryway of the room you’re working in is a great place to hang two vertically hanging pieces of plastic.

For best results, make sure the two pieces have a lot of overlap. The entryway should be taped shut while you are working. Wet sanding or using a sander with a vacuum attachment is two options for sanding. As a result, the total quantity of dust is reduced.

Removing Drywall Dust is a Simple Process

To begin, imagine that you’ve begun the project and that it’s covered with dust. What you need to do is as follows. Always use a mask and safety goggles to protect your eyes first and foremost. You’ll be more protected from the dust with this.

Second, water is the most effective means of removing drywall dust from a room. The water-absorbing properties of the dust make it impossible to float. It will be easier to sweep or vacuum up the dust if you have a few spray bottles on hand.

After you’ve completed sanding, use a moist towel to wash off the walls. It is easy to see where the dust has accumulated, and you can spray every surface in the room, including plastic-covered furniture. You don’t want to end up with a major water mess to clean up if you’re being a little too liberal with the quantity of water you use.

You may choose the manner that is most convenient for you from this point forward. Using a cloth, mop, shop-vac, or sweeping as a follow-up is not necessary. Check your work by repeating the process one or two more times. Once you’ve removed all the plastic from the room, put on some clean clothing and bring a moist towel with you.

How to clean furniture of drywall dust
cleaning off drywall dust

Despite your best efforts, drywall dust might still find its way onto your furniture despite your best preparations.

The small dust may sneak up on you from a variety of sources, including your clothes or the plastic covers on the equipment. In little concentrations, it may be found all throughout your home.

Shop vacs are vital to use since your regular vacuum probably lacks a HEPA filter. Vacuum cleaners may be clogged and broken by drywall dust. When it comes to cleaning your home, you can’t go wrong with a shop vacuum.

To remove excessive dust from upholstered furniture, take it outdoors and place a fan directly on it while you work. Dust will be blown away by the fan. After cleaning, you may use a moist cloth to remove any remaining dust.

In order to remove dust off wooden furniture, it is best to dampen a cloth or apply an anti-dusting agent.

Hire Lucky Painting Limited Calgary to take care of the messy clean-up for you instead of doing it yourself. Regardless of the size of your drywall installation project, we leave your house as clean as when we arrived.

All of your needs and expectations will be met by a team of experts. If you’re not a seasoned expert, drywall installation may be a lot of effort. Let us take care of it for you.

A skilled drywall and painting contractor can help you get the task done, so don’t hesitate to get in touch with us. The number to call is +1 403-891-4138. 

Use videos on YouTube, blogs with detailed instructions, and discussion forums to learn how to do anything. You may think that you can handle any problem that may arise in your house, even drywall repair. In order to save money, many of us are searching for ways to lower the cost of hiring a professional and the cost of the goods. However, cutting money on a drywall job may not be the greatest idea.

DIY drywalling is more difficult than it seems, and it’s worth the money to hire a professional.

What Makes Drywall Work So Difficult?

It’s easy to become intimidated by home improvement jobs, especially if you’re not very handy. In spite of their usefulness, movies and blogs may not be totally accurate. Or, they exaggerate the ease with which it may be accomplished. In the end, it’s just one of those things.


drywall worker or plasterer sanding and smoothing a plasterboard walls with stucco using a sandpaper holder.
It takes a lot of time.

Dredging is time-consuming when you aren’t an expert or a qualified professional. An experienced team of drywalling experts can complete a project in a matter of hours rather than days if you are a novice.

Make sure that you’re utilizing the correct tools, screws, spacing, and how to utilize them all before you begin the project.

Once the drywall is up and running, further expertise is necessary to bring the project to a successful conclusion. If you’ve never done it before, it may take a long time and a lot of work.

It's physically taxing

If you’re replacing a large piece of drywall, you run the risk of injuring yourself during the installation process. Drywall sheets are bulky, heavy, and difficult to handle when doing the job on your own. If you aren’t used to dealing with thick, heavy drywall sheets, it might be taxing on your body.

It requires a high degree of precision

There are a number of procedures that demand a lot of attention to detail, from the consistency of the joint compound to taping the drywall. Joint compound should resemble warm cake frosting in consistency. If you add too much or too little water, you won’t get the completed result you want.

Even though it seems to be a simple task, taping the drywall is not. It is common for individuals to remove too much joint compound behind the tape, which causes the second layer to blister. If you’ve done a good job taping, you’ll be left with the duty of applying the second layer. It’s the most difficult aspect.

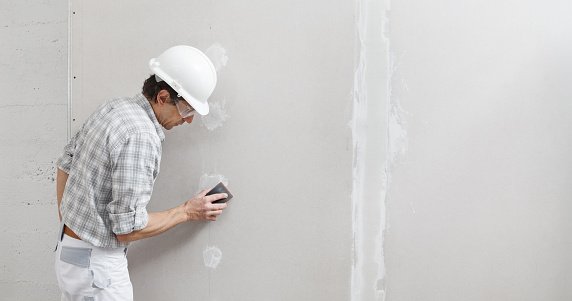
Even if you’re an experienced DIYer, it’s almost impossible to get this job done right, much alone a novice. It’s imperative that you take great care not to damage the drywall while still exerting enough pressure to ensure that the edges are smoothed out.

How Do Professionals Make a Difference?

There are others who prefer to take matters into their own hands. Some people, on the other hand, will never undertake anything without the assistance of trained specialists. Let’s say your attempt to complete a drywall project on your own fails miserably.

Your time and money will be squandered if you don’t finish the task. After that, you’ll have to shell out even more money to have it fixed. Which is likely to end up costing you more money than if you hadn’t done it yourself.

Experience and Knowledge

The time and money you’ll save by working with a contractor that has the right qualifications is only the beginning. Your expectations will almost always be exceeded by the final product The job will be accomplished without a hitch if it is handled by a skilled professional team.

When dealing with a firm that cares about your budget, you can expect a high-quality product at a reasonable cost.

They’ve Got the Right Equipment.

When you start a DIY project and you don’t already have all the supplies you need, you’ll have to buy them. An needless and costly expenditure is the purchase of tools and supplies for a single project. Hire a professional since they already have the necessary tools and resources. No need to spend money on tools that will only be used once or twice.

They’re also well-versed in the proper use of all kinds of tools and equipment. That means that there will be no injuries or harm caused by this method.

Improved Outcome

You won’t know what to expect if you’re starting a project for the first time. In other words, your final output may not be much better. An expert in their field can restore your drywall to its former glory. In particular, you’ll want to spend the money to get the best outcomes on the most major investment you’ve made in your home.

Don’t Stress Yourself Out

You’ll waste a lot of time and money if you try to fix or install drywall on your own. If you aren’t talented enough to handle the task, it will also bring you a lot of worry. Don’t put yourself through unnecessary stress by entrusting your project to a team of experts.


Rather than wasting time on this activity, use that time to pursue something else that you like doing as well.

Trust the professionals at Lucky Painting Limited Calgary to accomplish a great job for you instead of dealing with the mess, cleanup, painting, money spent, and stress acquired. Call Us now at +1 403-891-4138 or fill the contact form to get and estimate at Calgary’s best competitive price.

Your Company's Interior Design Color Scheme

Your Company’s Interior Design Color Scheme

Isn’t it all paint? Yes, but it’s not quite like that. This article can be helpful if you’re trying to decide on your company’s Interior design color scheme.

Your Company's Interior Design Color Scheme
Set of colorful green realistic square box with fabric texture on white background. 3d rendering

In the end, you’ll learn that the color palette you choose may have an impact on your employees and on your company as a whole.

Subtly, the color of your company may convey a message about your work environment’s productivity and purpose. Here are a few pointers for picking a color scheme that goes well with your office’s decoration.

Choosing a color scheme for your office

Choosing the right color scheme for your interior painting job is a daunting undertaking! It takes a lot of time and effort to come up with an original idea. You’ll want to keep these things in mind while choosing your color palette.

Do you have any interesting patterns or prints in your home or office? For example, a beautiful rug, a piece of art, or even a specific cloth, such as a blanket.

In order to generate complimentary colors and a color palette, it is possible to use a prominent print or pattern in your area as a starting point.

Think about color values and their right placement and dominance in a space. Professional painters and color experts often recommend using darker flooring colors (for example, a brown). For the inside wall painting, you may choose a medium color value, such as beige or tan. For the painting on the ceiling, use a pale cream or off-white. This helps to develop a color scheme that works nicely in the space.

Think upon a color scheme for the key parts of your home first. In an open-concept home, it’s critical that the movement between the kitchen/dining area and living area be smooth.

How to decorate using a color wheel

We’ve all seen a color wheel at some point, even when we were only learning about colors in elementary school. Adults may benefit from the use of a color wheel when selecting a color palette for home design. Look out some of the color combinations that you can obtain from a wheel of the rainbow!

Bold Colours,Nature, Abstract flower, Pink

Creating a monochromatic color scheme is always the simplest of all the color schemes to come up with. There are many distinct colors, tones and tints within one color that may be used to create monochromatic designs.

If you choose the color blue, for example, everything in your design scheme will be based on shades of blue.

An example of tetrad (or rectangle) color schemes is a combination of four complimentary hues.

A tetrad color scheme may be created by drawing a rectangle between each of the four colors you’ve picked as your four main accents. There are equal amounts of each color on the color wheel when using this particular scheme of color.


The employment of a base color and the complementary color of that base color is known as a complementary color scheme. The color wheel’s complement is on the other end of the spectrum. An accent color is frequently used to compliment or contrast with the primary colors in the design.

Suggestions for a Color Scheme/Interior Paint Scheme:

It’s not uncommon to see things painted in shades of blue. Confidence, security, honesty, loyalty, and conservatism are all conveyed by the color blue. Labrador Blue is a cool blue that isn’t too dark.

Green is the second most preferred color, according to surveys. For centuries, people have connected the hue green with prosperity and tranquility. A richer, deeper hue of green may denote status and affluence. Despite its name, Green Monster is a gorgeous shade of green.


You might use an orange color scheme to balance out the powerful statement that navy blue conveys.

It has been shown that the color turquoise has a positive effect on one’s mental state. If you’re wanting to paint the inside of a marketing or advertising firm, this color can be a nice option.

Here are a few more pointers for selecting a color scheme:

It’s a good idea to keep in mind that the more cheerful the color, the less serious the workplace will look (depending on the type of business, of course). You’ll need to think about the kind of people who will be working at the office and coming in as customers. You want to create a professional feel in your business’s interior.

For example, if you want to paint a dentistry clinic or naturopath’s office, peaceful and serene colors would be the most appropriate choice. Blue, green, and yellow are some of the colors used in their creation.

Choose a color scheme that includes green and blue to create a productive work atmosphere. To balance out the color scheme and create a less stressful working atmosphere, use some warmer tones.

However, too much red in the workplace might cause mood swings and bad behavior. However, if there is too much orange or peach, it will create a convivial atmosphere that stimulates conversation. They would be ideal for a staff lounge, but not necessarily where the actual work is done.

Make sure that yellow is included into the color scheme of the space if you want to use it for note-taking and training. This color has been shown to help individuals absorb and remember more information by painting their interiors in this shade.

Theory of color and color association

Did you know that there is a scientific basis for how each color affects you? Even a little variation in saturation (the degree to which a color is strong or weak) may have an enormous impact on the way you feel and think about a certain color and its effect on your mood.

Color theory is at the heart of it all. When it comes to working with color, there’s an art and a science to it. What matters most is how a color makes you feel when you see it. In addition, when individuals enter a space with a certain color scheme, they feel more at ease.


What you need to know about color theory.


Let’s go through the fundamentals of how different colors on the color wheel affect individuals. To get you started, here are the primary colors on the color wheel: red, yellow, and blue. These colors are blue, red, and yellow. That time in elementary school when we first learnt about them? There has always been a strong connection between these colors and every other color in the spectrum.


Violet is a color that may be created by mixing red and blue, for example. There are also transitional colors, such as blue-greens or red-violets, that fall somewhere in between. Let’s take a closer look at it.


cooler shades


Colors like green, blue and purple make up the colder end of the spectrum. For a more subdued and natural design, these are all excellent choices since they tend to conjure images of water, sky, and the great outdoors in general. It is common for these colors to induce sentiments of serenity and calmness.

The color blue is utilized in a wide variety of ways, particularly in design. Light blues have a calming effect on the mind and body. If you have a lot of traffic in your kitchen or living room, a warm and inviting color like yellow might be a good choice for the area. Colors with a darker shade of blue might conjure up thoughts of power and stability in the viewer. Color blue has many implications that are deep and expansive, like the ocean.

Another color that appears in many different places is green. Because it used to be the color of money, some people typically connect the color green with prosperity and vigor. Green is generally associated with fresh growth, nature, and the ground, plant life, and trees. Green may also express a feeling of balance and harmony since individuals typically experience a sense of security and anchored-ness toward it.

Purple is a mix of red and blue, and as a result, it may take on traits from either one or the other. If you’re looking for something with a more romantic vibe, go no further than light purples. Some individuals, when they see a wonderful light purple, also think of springtime and flowers. Due to their historical background, many deeper and mid-range purples conjure images of monarchy and riches.

Mint, grey and white colored geometry abstract 2020 trendy art background.

Brighter hues

Increase the level of warmth in our color schemes even more. Reds, oranges, and yellows, as well as all of their variants, make up the majority of the palette. The sun and fire are all represented by these colors, which may be seen in abundance throughout the autumn season.

Use of warm colors and their variants may often convey a person’s enjoyment, passion, and excitement in their house. With a warm color, you may create an energetic atmosphere in your home or office.

It is very strong when employed in design, to the point that some individuals find it too overpowering in excessive amounts. If you want to convey power and aggressiveness while yet maintaining an air of refinement, you may choose deeper colors of red to achieve this goal.

Orange is a lively and energizing color to include into a space. Because it’s the color of fall, there’s a chance of a connection to the soil. Stepping into an orange-themed space might inspire some people’s imaginations. The fruit, on the other hand, conjures up images of excellent health and vitality.

Brightness and pleasure are nearly usually linked to the color yellow. Many people associate brighter yellows with hope, which is why they are often utilized in nursery décor for both boys and girls. In a colorful workplace atmosphere, a touch of yellow could also aid with productivity.

Cost of Interior Painting in Calgary

Interior painting in Calgary is expensive.

You should not take on an interior painting project carelessly since it is time-consuming and often enormous in scale. An enormous job in terms of the number of hours it takes, but a costly one as well. To get the finest outcomes, you’ll need to prepare ahead of time. You may be worried about the price of painting a room in your home. How much it will cost you to paint the inside of your house depends on a variety of things, including how much time and effort you put into it.

1. the area to be painted in terms of its dimensions

2. The sort of paint used.

how much you pay a painter

Hiring a professional painter to do the inside painting of your house may be quite expensive. Your prices will be based on the size and number of rooms in your home. The cost of hiring a painter should be included into your planning process. It’s not always the most cost-effective solution. There are several aspects to take into account. Because of this, you should seek many quotations from area painters in order to compare their pricing.

HOW MUCH DOES IT COST TO PAINT THE INTERIOR OF A HOUSE?

It is easy to compute the average cost per square foot of painting the inside of your house by using the labor expenses, the number of coats of paint, and the average hourly rate of professional painters. A rough estimate of the overall cost of painting your house may be obtained by looking at the price of this paint. There is a wide variation in price across states as well. It is possible that the cost in your region will be affected by the location of your area and the expertise of your painter. In order to get a more accurate estimate, there are a few things you may do. Depending on the size and complexity of the project, as well as the color selected and the surfaces that need to be painted, painting an interior house may cost a lot of money. How much you’re willing to pay depends on a variety of factors, including the time of year, weather, and whether or not you’ve previously bought paint.

A ROOM PAINT JOB COSTS WHAT?

This is the question that terrifies us all. How much does a painter charge per square foot? How much does it cost a day to hire a painter? This is a question that can only be answered by looking at the walls. Depending on your region and the size of the space, the cost of painting an average-sized room might vary from $300 to more than $600. From 1200 square feet to 1500 square feet, a typical master bedroom may be found. The kind of paint, quality, brand, and concentration of pigment all play a role in determining how much paint to buy for a certain space. Always contact a professional estimator before making any product selections for your project. For example, painters who come out to paint a 1600-square-foot living room should base their estimates on the typical cost of painting a 1600-square-foot room. If you do this, your job will be priced properly. Make sure that the painter gives you a price per square foot for both goods and labor. Once this is done, be sure to get an estimate that takes into account both the supplies and labor. Make certain that the painter’s estimate includes not just the sticker price but also the expenses of the supplies and labor. If you do this, the painter will be in a position to offer you an accurate quote. Ensure that the estimate is accurate by showing up in person, verifying the estimate after the painter has finished, and requesting a copy of the final bill after the painter has left. So you may rest easy knowing that you paid the proper amount for your transaction. An hourly rate, supplies, and labor charges are typical fees painters charge, and this is what you will get as your final bill. The cost of interior home painting varies from project to project and from area to region depending on who the painter is, the kind of paint they use, and how many coats of paint they apply. You may save money on paint by using less or customizing your order for numerous coats from a skilled painter.

THE COST OF KITCHEN PAINT WORK

Adding some color to your kitchen is as simple as painting the walls. Unlike other kitchens, this one has a distinct style that sets it distinctive. As for the expense of painting our kitchen, we don’t know. When was the last time this question was asked? We’ve already figured out the solution. Painting carries a hefty price tag. It’s a hefty price tag. Even while paint is more costly than other materials, it isn’t a need. As well as being visually appealing, the paint you pick for your kitchen should help protect your walls and cabinets. The size of your wallpapered area and the style of countertop and cabinetry in your kitchen will affect the cost of painting. When it comes to achieving the finest effects from a paint job, choosing the appropriate paint is essential. How much does it cost to paint a kitchen? The kind and extent of coverage must be taken into consideration. When painting a wall or cabinet top, the kind of paint used and how thickly it is distributed may have a significant impact on how well it covers the surface. The cost of painting the kitchen is influenced by your knowledge of the approximate amount of paint you’ll need to buy.

KITCHEN CABINET PAINT WORKS COST

In the minds of many individuals, DIY home renovation tasks may be done at a low price point. Let’s face it, painting kitchen cabinets isn’t going to save you money. It’s because the cost of painting the cabinets will be a significant amount of the total project cost. This proportion should be known ahead of time, and knowing what it will be is a smart move. Having a little extra cash on hand is a good thing since there are always going to be other things that need to be taken care of. After painting the cabinet once, but needing a new coat to make it appear its finest once again, you may not be interested in painting it again. Depending on where you reside and the supplies you choose, painting a single cabinet might cost anywhere from $400 to $700. However, with a little forethought and study, you’ll be able to make your home renovation projects simpler and less expensive than ever before.

THE COST OF PAINTING A BATHROOM

Bathrooms in Canada are often tiled with ceramic tiles. As a result, it doesn’t need any painting at all. It’s just necessary to paint the ceiling. The small size of a non-tiled bathroom might increase the cost of painting. It all depends on the walls, the size of the space, and what you’re painting. Alternatively, it might be a huge project that requires a lot of money to implement. If you just want to freshen it up, you may be able to get away with painting it for $400, but if you want to undertake extensive work, you’ll need at least $5000. You may save a lot of money in the long run if you plan ahead before you start painting.

THE COST OF PAINT WORK ON WINDOWS AND DOORS

Protect your property from dust, filth, and airborne toxins by painting it with a high-quality professional finish. In addition, it is resistant to heat, cold, and ultraviolet radiation.. Professional paint primers should be on your purchasing list for this reason. Oil-based vs. water-based paints have different prices, as do several layers and whether or not hardware paint will be used for the last two coats and extra colors (if necessary). Due to the kind of door surface (fibreglass, wood-grain vinyl or aluminum), the product quantities you wish to acquire for your project and color, your bid may be impacted by the weather conditions. Solid hues like white, gray, and blue cost less than multi-colored ones like red, purple, and green, which are more expensive. The cost of a typical door painting job ranges from $125 to $185, depending on the area.

INTEREST IN PAINTING THE CEILING

It’s similar to painting a wall in that the cost of a ceiling painting may be influenced by a variety of elements such as square footage and the location. Additionally, ceiling kinds need to be taken into account. Popcorn ceilings are more expensive to install than flat and smooth ceilings, such as drywall. Flat, smooth ceilings may be painted with a brush, while flat, textured ceilings should be painted using a sprayer. There is a lot of work involved in painting the ceiling, but you’ll also need to buy a few materials. About 80% to 90% of the overall cost is labor-related, while the remaining 10% to 20% is supply-related. When painting ceilings, you need to know how many square feet of ceiling you have. Painting a room of average size costs $200. A professional paint job might cost anywhere from $60 to $150 per square foot, depending on the state of the ceiling. Hiring a ceiling painting firm will provide the greatest results. By doing so your ceilings will be slightly harmed and the task will be done properly.

How much paint do I need to cover the surface?

400 square feet may be painted using one gallon of paint To figure out how much paint you’ll need, take measurements of the room’s dimensions and form. The more information you can provide, the better. In order to figure out the room’s square footage, use a measuring tape or unit meter (1 square meter equals 10 square feet). As a last step, utilize one of a number of online paint calculators to find out how much paint you’ll need per square foot (or gallon).

EXPENSES RELATED TO PAINTING

The cost of paint varies depending on the kind of paint you buy and how much you buy. When you know what color you want, it’s simple to compare pricing at the paint shop. The cost of a single-color shade, such as white or gray, is lower than the cost of a multi-color shade, such as red. Professional painters usually give typical pricing due to their expertise and the variety of paints they employ. The kind of paint you select should be determined by your budget. You’ll guarantee that the paint on your house looks its best and lasts longer if you follow these tips. All the extras you need to get the job done—paint primer for example—cost money. These items are essential for professionals. Paint and supplies account for 15% of the cost of hiring a professional painter, but salaries account for 85% of that cost.

HOW MUCH DO PAINTS AVERAGELY COST?

Two gallons of paint are required to paint an average-sized room of 1200 square feet (or more depending on the quality). You should expect to pay between $30 and $79 per gallon of paint, depending on the sort of paint you select. Paints of superior quality are often more costly. In addition to flat, semi-gloss, and high gloss, paint may be purchased in a variety of finishes. Flat finishes are preferable in places that need frequent cleaning since they are less reflective. However, these finishes are simple to clean and have a subtle sheen. Stain resistance and ease of cleaning are two advantages of a high gloss finish. The finest paint finishes for living rooms, hallways, and trim are matte, semi-gloss, and high gloss, respectively. Most of the time, priming is required. Against a primer, paint stands out because it inhibits the paint behind it from blending in with the rest of the surface. Primer may be purchased for anything from $7 to $20 per can. Pre-primed paint reduces painting time by simplifying the layering process.

How much does a painter charge for their services? –>

A painter’s fee is based on the number of square feet he or she covers. The cost of a room is based on its size and quality, as well as how accessible it is. Painting a tiny space is more costly in general, but it’s definitely worth it if you want a certain appearance and feel. A typical hourly rate is charged for painting outside surfaces like as siding, exterior garages, decks, sheds, and porches. Based on how long they think it will take them to complete a task, painters estimate the overall cost. Other things to think about are:

1. Location

What you do for a living (interior vs exterior)

3. The artist’s training

4. Season

For example, it is not uncommon for painters to charge several rates for the same job. If you choose a contractor with a lot of expertise, you’ll obtain the greatest pricing for your interior painting. If you are searching for a painter with a comparable skill set to the one you are looking for, it will be beneficial. Furthermore, it will be simpler to choose a painter that is within your price range if you have a certain budget in mind. You should collect many quotes before making a final decision. Taking a look at the pricing will help you choose which is the best fit for your wallet. Don’t tell any of the companies you’re contacting about your plans. After comparing the quotes, make your selection based entirely on cost. Before working with any firm, be sure to get an estimate in writing. Requesting an estimate in writing ensures that you have all of the necessary information, such as the start and completion dates of the project and the supplies required. Prior to beginning the painting process, it is a good idea to take pictures of your property to reference later. Your painter should be scheduled early enough in your project so they don’t have to hurry or cut shortcuts to meet a deadline. To ensure that you are protected in the event of an accident while they are working on your property, inquire about their warranty, insurance rates, and workers compensation rates. Especially if you’re recruiting a new employee, it’s a good idea to check over their previous work.

When it comes to painting the inside of a two-story house, how much does it cost?

Depending on whether you’re painting the ceiling, walls, or trim, interior painting might cost anywhere from $1 to $3 per square foot. Professional painters might charge up to $4 extra per square foot. When it comes to a wall’s lifespan, it all depends on its condition. Repairing or fixing holes in the walls incurs extra fees. As a result, it would cost you at least $2000 to paint a 2000-square-foot room. The cost of painting a 2500-square-foot home, regardless of how many gallons of paint it needed, is $3000. $6000 to $7500 if you want the best quality, which is twice as pricey but worth it. So, the prior painter wouldn’t have to rectify their faults, at least. By employing one, you save a lot of money compared to hiring many.

How To Get The Perfect Interior Painting Finish

Contrary to popular belief, painting the inside of a home is more difficult than it should be. Most of us learned how to apply paint on a flat surface via finger-painting in elementary school. Interior painting done by a true professional, on the other hand, is a completely different story. Make your next interior painting project go more quickly and smoothly while also producing a neater, more appealing result.
Clean the Surface with a Tack Cloth

Before painting or staining, prepare the surface using a tack cloth. It’s a cheap painting equipment that may help you get perfect results. A cheesecloth or tack cloth soaked with beeswax gently removes sawdust, wood shavings, and other dirt from your surface. You may avoid using a damp cloth on the surface by using a tack cloth. Make careful to wring out the water from the cloth fully before using it in place of a tack cloth. To avoid damaging big surfaces, avoid using a tack cloth. Suitable for trim, doors, and cabinetry rather than for walls and ceilings. Avoid smearing beeswax on the surface of the tack cloth by pressing gently instead of firmly. Beeswax is difficult to remove.

Brushes and Roller Covers of the Highest Quality

Fuzz and lint are left on the walls by low-quality roller coverings. It’s tough to fix rough walls if fluff and lint are entrenched in the paint and the paint has dried. Streaky brush marks may be avoided by using high-quality brushes and taking great care of your expensive investment. Inexperienced DIY painters often make the mistake of using cheap chip brushes. It is not recommended that chip brushes be used while painting the inside of a home. Instead, they’re made for slathering on the glue, adhesive, or solvent of your choice. When it comes to roller covers and brushes, investing a little more money is well worth it. Your finished product will look better.

Margot Cavins / The Spruce.

Get the Best Paint You Can Find

What’s the difference, besides price, between a paint offered for a certain price and a paint promoted for five times as much? If you’re looking for the cheapest paint, you’re more likely to find it in a lower-quality builder-grade product that lacks solids. A successful paint build relies on the use of solids. Fast, cheap, and low-commitment paint projects may be accomplished using builder’s grade paint like Sherwin-Williams ProMar 400 Interior Latex and Valspar Professional Interior Latex. However, if you want a paint that will endure, you need invest in a better quality paint.

1. Decide on a room’s style.

Rectangle

Square

Custom

Use duct tape to check for loose paint.

It’s important to know whether or not the surface can accept fresh paint, as well as how long it will last. It’s hard to know what the future holds, but a piece of duct tape may give you a fair idea of the quality of a surface. Apply a new strip of duct tape on the surface, then peel it off. You may need to scrape and then sand if paint flakes larger than microscopic size fall off.

Wear Latex or Nitrile Gloves

When you’re painting, latex gloves keep your hands nice and clean. Water-based latex paint is easy to remove off hands, but enamel and oil-based paints are more difficult to remove. If you’re allergic to latex or don’t like latex gloves, try nitrile gloves instead.

Distribute Low-Stick Painting Tape Throughout the Area

It’s easy to remove the low-stick adhesive on blue tape, also known as painter’s tape, without damaging the primer or already-applied paint. Painting the edges of any surfaces that aren’t going to be painted, such the wall-ceiling junction, is a worthwhile investment in painter’s tape.

Margot Cavins / The Spruce.

Avoid Overlap Marks by Keeping the Edge Wet.

The wet edge of your painting should be maintained at all times, and you should work away from that edge. The more reflective the paint, the more likely it is to display overlap markings. The wet edge of semi-gloss and glossy paints, in particular, need careful attention. Flat or matte paint, on the other hand, essentially eliminates the possibility of forming overlapping markings.

Clean Areas Should Be Covered With Masking Film.

Professional painters use masking film all the time, but it’s a little-known fact among do-it-yourself painters. In either a roll or a folded-up square, masking film is a thin plastic sheet. In order for it to operate, it has to be very thin. Masking film, unlike thicker plastic sheeting used to cover furniture, sticks to flat surfaces and doesn’t fall off when it’s removed. There’s no need to tape the film down unless you’re bringing it up to the painted surface’s edge. Masking film is held in place by static electricity.

The Brush or Roller Can Be Protected With Wrapping It.

Picking up and cleaning up after a painting session is a necessary afterthought. Getting rid of the gunk from the brushes and rollers is something that a lot of people detest doing. Cleaning brushes may be a hassle, but a paint comb makes the job a lot easier. Even if you wash the roller cover many times, it still dries rigid and is no longer suitable for usage.

However, there is a trick to avoiding all of that cleaning. Keeping your roller cover or brush with the paint still on it is possible if you know you’ll be back to your task soon.

You may freeze brushes and rollers by placing them in a plastic bag and placing them in a freezer. This will keep the brush or roller in good condition for a long time. Allow the roller cover or brush to defrost thoroughly before using them again; alternatively, if necessary, use a hair dryer to warm them up.

It’s okay to keep brushes and roller covers away of the food zone by simply wrapping them in plastic and setting them outdoors to dry at room temperature. Make sure that the plastic is airtight before you begin. This should keep the brush or roller cover intact for the remainder of the day… A really tight wrap can allow you to postpone the procedure until the next day.

This entire process can appear cumbersome without some professional help. We are here always to allay your worries. Call us now for the best interior painting in Calgary. We offer free estimates both onsite and through video calling.

Industrial Painting Contractor Search Guide: 7 Steps To Success

Is painting a need or a choice?

There are two reasons for this: protection and/or aesthetics. Protection against corrosion and damage may be gained by painting or applying a coating. It has an attractive appearance and feel because of its clean, smooth, and often colorful surface.

Painting, on the other hand, is more complicated than just grabbing a bucket, a brush, and slapping on some paint.

Prior to applying a coating, think about what you’ll apply it to, how you’ll apply it, and what you want the finished product to appear like.

Preparation of the surface before painting is also crucial. With little or no preparation, the final output may suffer.

Do you feel overpowered?

Industrial painters are sought precisely for this reason. In order to assist you reach your objective, they have the necessary skills and knowledge.

Is there a way to tell which contractor is most suited for your project? In order to plan out your project, keep these seven stages in mind.


IDENTIFY THE AREA OF YOUR JOB THAT YOU WANT TO TAKE ON


It’s a good idea to begin your search for a painting contractor by restricting your options.


Painting contractors often specialize in one of three areas: interiors, exteriors, or both.


  1. Painting a house in a neighborhood Your house would be painted by a contractor as part of their job.


If you’re painting a retail shop, for example, you’ll likely require the services of commercial painting contractors.


  1. Painting at the workplace Most often, contractors are engaged in the construction of industrial facilities, power plants, bridges, natural gas assets, water towers, stadiums, universities, and naval vessels.


The remainder of this piece will be devoted to the topic of industrial painting.


Each project has its own set of obstacles and considerations. To begin, you may begin by completing the following questions during your planning phase:


In order to complete this job, should I hire an industrial painting contractor?


Why do I need to hire a painting contractor?


  • In which part of the world is my project being carried out?


  • Are there any environmental issues to be aware of?


Do I need my job finished by a certain date?


What extra construction services do I need the contractor to do for me?


When it comes to project planning and decision-making, who is necessary to include?


The Project Manager is the most apparent choice for inclusion. However, not all Project Managers are vested with the power to make financial choices pertaining to their projects. Several Project Managers or even a buying team may be required, depending on the project’s scale.


To ensure that operations are not disrupted by the work being done, Operations or Facility Managers may need to be engaged in the project’s timeframe, prioritizing, or scheduling.


During off-hours, a power plant outage, or when volume is reduced in a manufacturing setting, work might be done.


As a last step, you must decide which contractors to include in the proposal.


Occasionally, the contractors may be helpful to you in developing the specs for your bid package. Their inquiries into the project’s specifics may provide further information about the job’s requirements and requirements in general. On the other hand, you may want to bring in the contractors once the specifications have been worked out.


STEP 1: DETERMINE YOUR SPENT LIMITS


Every company has its own unique way of establishing a project’s budget. Finally, you must determine your financial capabilities.


You should be able to estimate how long it will take to finish your job if you’ve completed a number of comparable ones in the past. Your project may need the input of prospective contractors or others in the business if it is unusual.


SET UP A CALENDAR


Two independent timeframes are needed to determine an overall project timetable:

In the first place, there is one for the successful completion of the project as a whole, including the actual job itself.


Secondly, there is the process of hiring a contractor.


WHEN CHOOSING A CONTRACTOR, REMEMBER THESE FACTORS:


  • How long will it take for you to prepare and receive bids?


  • Is there enough time in this schedule for the contractors to make a site visit if that is necessary?


  • Is there a need for a pre-bid meeting?


  • How long will it take you to examine the proposals you receive?


Is there enough time between awarding the task and the commencement of the project to allow for the contractors to begin working on the project?


Consider the following for the project’s timeline:


  • Do you have a deadline for the project’s completion?


  • Is there a deadline for achieving compliance?


  • In what time frame should this be completed?


  • To minimize company interruption, are there precise timelines that you must follow?


  • Are we going to have the money for this project when it’s due?


A BID DOCUMENT CAN BE CREATED


Surface preparation and the substance to be coated both have an impact on the sort of coating that is appropriate.


Industrial painting contractors and coatings manufacturer sales representatives can help you figure out which materials will perform the greatest job of safeguarding your assets, even if you already know what that is.

PREPARATION


Additionally, consider about how the area will be readied for coating before deciding on a product. For instance:


Does the task need any of these items or processes?


  • What kind of paint system should I use?


On a daily basis, what will the coatings be exposed to?


Don’t be afraid to ask!


A pre-bid meeting and/or a bid walk are advised to verify that your bidders understand the scope of the project.


These meetings provide contractors a chance to ask questions about the project and see it for themselves. It also makes it more likely that you’ll be able to compare like with like when you get your bid answers.


SELECT BIDDERS FROM A LIST


Everyone understands that it’s a good idea to examine a contractor’s qualifications or pre-qualify before employing them.

EXACTLY WHAT YOU NEED TO KNOW FOR THE BIDDER LIST:


  • How long has the company been in operation? –


  • Who are the competent contractors for the job?


Where is the project situated, and what firms are eager to work there?


Companies who have executed comparable projects in the past should be considered.


  • What certificates and trainings do the contractor’s workers need?


  • What is the industry’s opinion of this business?


  • Is their work of a high standard?


  • Is their EMR (Experience Modification Rate) high enough?


  • Do they conduct themselves in an ethical manner?


After you and your project team have evaluated the proposal answers from the various vendors, you must choose a contractor.


Consideration should be given to more than just price when making a purchase decision.


First, does the contractor have a good track record of working well with others?


Not at all, why not? Sometimes a contractor’s lack of response or poor communication is justified. Consider this while making your decision.


What’s the point of going back to a bidder to find out why their offer was so high or so low in comparison to the others?


It is possible that the lowest bidder left anything out or used a product that is not what was specified. The worst thing that may happen is that the bid papers that the contractor submitted might be read in a different manner than what they thought they were doing when they submitted their proposal.


CONCLUSION


This seven-step approach is an excellent way to start and decide who needs to be a member of the project team when preparing for your next industrial painting job, but there’s no way to account for all of the project-specific hazards. It is possible to modify this strategy to your company’s unique demands as you finish additional tasks, and, ideally, choose the finest contractor for your work. Lucky Painting Limited is head and shoulder above others when you need an industrial or commercial paint job in Calgary. Our team of experienced painters have decade plus of experience that’s unrivalled. Our portfolio is our evidence of commitment to superior standards. Please call us now to get a free quote anywhere in Calgary .

 Paint  Can Revive Your Floors!


Floors are subjected to more wear and tear than any other aspect of a house. Floors are subjected to a great deal of abuse, whether it’s from people walking on them all day or moving furniture around. Anyone who has owned a house for a long time will eventually have to deal with less-than-perfect flooring. Anxieties from contemplating the costs and difficulties of repairing or replacing wood flooring might be relieved by opting for a less typical solution: painting your floors.


The Benefits of Painting Floors


It’s an affordable choice. Flooring replacement may soon become an expensive operation, with costs easily exceeding the thousands of dollars, not to mention the time lost from work and the disturbance that such large projects bring. Painting wood flooring is a far more cost-effective option. To do so, you don’t need to hire a contractor and all of the essential supplies may be purchased from your local hardware shop. Cleaning materials and quality paint are all that’s needed for a fresh coat of paint.

It’s a piece of cake.


There’s no need to be concerned about paint leaking or splattering while painting wood floors; just be careful not to paint yourself into a corner. As a bonus, you get to enjoy the pleasure of finishing the job yourself, which saves you money in the long run. For one thing, painting your flooring may be done on the weekends instead of taking time out of work to oversee strangers in your house for a day or more. When it comes to little jobs, contractors may be reluctant to take them on or demand exorbitant fees, so it may be cheaper to do the work yourself. You can just paint over it if you don’t like the results, however having carpet or wood floors replaced can cost you a lot of money and effort.


You may let your creative side out and express yourself. When you paint your floor, you have a lot more creative control over the final result. You don’t have to stick to a formula; the only restriction is your own creativity. There are several ways to add geometric forms, patterns, or even floor murals to a space. In only a few hours, a room’s atmosphere may be completely transformed by painting the wood flooring.


They don’t need a lot of upkeep. When it comes to maintaining painted wood floors, it’s pretty simple. Because of the paint’s durability, all you need to maintain your floors looking their best is some soap and water. Additional advantages of painting concrete include preserving the concrete and reducing dust.


Old, dingy flooring may be revitalized with a fresh coat of paint. Not to mention, it can be a lot of fun. So, if your floors are in need of some TLC, pulling up a paintbrush and slathering it on thick can be an option.

Bathroom Mold and Mildew Detection Tips (And How to Get Rid of It)

Wet, gloomy places entice mold and mildew to thrive. Even if your restroom isn’t “damp and dark,” you’re probably not going to characterize it that way. Even in the most cheerful of restrooms, there are a surprising amount of little, gloomy places. With the sink, tub, shower, and toilet all containing water, bathrooms are a breeding ground for mold and mildew.


Mold and mildew thrive in these kind of places.


In the long run, the more harm mold and mildew may do, the longer they must be dealt with. To top things off, you don’t want your family and pets to be near them.


Mold and mildew may grow in your bathroom if you don’t know where to look for them and how to get rid of them.


What you need to know about mold and mildew in your bathroom is covered in this article. We’ll also go through how to get rid of mold and mildew if you come across any of these problems.


5 Signs Your Bathroom Has Mold or Mildew


Moisture is required for mold and mildew to flourish. Both dangers are absent in a waterless environment. For this reason, it’s important to keep an eye out for any symptoms of water damage in addition to mold and mildew development in the immediate vicinity.


Here are five frequent signs that your bathroom is infested with mold, mildew, or water damage.


Mold Growth That Can Be Seen


Let’s start with the most apparent problem—mold that can be seen. Despite the fact that this may seem obvious, it’s critical for one simple reason.


Underneath the surface, mold normally starts to form. You’ll likely have a serious issue by the time you notice it.


Gray, black, or dark brown is the most prevalent color, and the mold often has a downy or wooly feel. While some molds in the home are brown or yellowish, others might seem fuzzy or slimy in color.


RELATED: Mold in the Home: Types and Effects


  1. The Smell of Must


It is common for mold and mildew to develop in dark, moist spots that are difficult to detect. As well as areas such as behind walls and inside of cupboards.


Before you can see it, you may be able to smell mold and mildew.


Mold spores release an odor as they decay. It has an earthy or stale taste. Mold, a concealed leak, or both may be to blame if your bathroom smells musty even when it’s clean and dry.


Insects


Residing on wet wood is favored by ants. Seeing ants in your bathroom might indicate that mold is developing under your floor tiles and decompose your floorboards.


Soft Spots on the Floor of Your Bathroom


Moisture and/or mold development may cause the subfloor of your bathroom to decay, making the floor feel mushy when you walk on it.


Who knows what’s behind it. Under your home, there might be a leak or other source of water damage. Even if the floor doesn’t seem soft, it’s essential to bring in an expert to inspect the area for any issues.


Damage to the Walls


Signs of water damage include crumbling plaster, cracked or loose tiles, discolouration, scorching paint, and holes in the caulk or grout. Any of these signs might point to the presence of mold development behind the drywall or tiles.


If your home has seen extensive water damage, the walls and tiles may seem twisted or loose enough to move when you touch them.


Getting Rid of Mildew


Because mildew develops just on the surface, it is much simpler to remove than mold. Common home cleansers are typically all that is needed to get rid of it.


Vinegar and Baking Soda are effective for removing mildew from surfaces.


It’s advisable to begin with a light cleanser since aggressive cleaning chemicals might harm surfaces or pose health dangers.


Using a spray bottle, add white vinegar to the mixture. 2. Shake well before using.


  1. Spray surfaces where mildew development may be seen.


For a few hours, let the vinegar sit on the surface.


Wipe it down with a damp towel after a few minutes. (To get into small spaces, try using an old toothbrush.)


  1. Rinse the surfaces with water to complete the cleaning process.


Apply a paste consisting of 3 parts baking soda and 1 part water if the mildew persists. On top of that, spray additional vinegar. Rinse with water after scrubbing with a bristled brush.


Repeat this procedure until all the mildew has been removed.


Resolve Mildew Problems Permanently by Using Hydrogen Peroxide


To get rid of stubborn mildew, spray the area with hydrogen peroxide and then scrub it clean with baking soda and vinegar.


Mixing vinegar with hydrogen peroxide, on the other hand, may be harmful. Before using any other cleaning agent, it is essential to completely rinse the surface with water after using vinegar.


Use different spray bottles for each ingredient, of course.


To remove the most stubborn mildew stains, use bleach.


You might try a mix of 75 percent water and 25 percent bleach if hydrogen peroxide fails to remove all the mildew from your carpet.


Don’t ever use cleaning products that have been mixed. Ensure that the surface has been properly washed before applying bleach if you’ve previously used hydrogen peroxide, vinegar, or any other cleaning agent.


Rubber gloves and eye protection are also essential.


Mold Remediation


You may not be able to remove all of the mold entirely by yourself since it penetrates surfaces. It’s possible that the process of clearing mold may release spores into the air, which can then spread throughout the rest of your home.


Having a lot of mold in your bathroom may need the services of a professional. Protect yourself against mold spores by wearing gloves and a mask and working in a well-ventilated area while cleaning.


Borax is an effective mold-killing agent.


Small quantities of mold may be removed with soap and water. Mix one cup of borax with one gallon of warm water if that doesn’t work.


Douse the moldy areas with a borax solution. Remove the mold spots with a sponge, cloth, or scrub brush.


The borax solution may also be used to clean moldy vinyl and tile flooring.


Using Bleach to Remove Mold


When it comes to getting rid of mold spots, bleach is an excellent choice. Bleach, on the other hand, should be avoided if your bathroom does not have enough ventilation.


When using bleach, open a window or turn on the exhaust fan.


To clean nonporous surfaces including toilets, tubs, sinks, and showers, use 1 part bleach with 10 parts water. When cleaning the walls or the ceiling, avoid the use of bleach.


Cleaning Porous Surfaces with Vinegar


A vinegar solution may be applied to porous surfaces, such as walls or painted ceiling tiles, to remove stains.


Textured walls and ceilings, on the other hand, will have to be removed. It’s better to leave this to the professionals.


When in Doubt, Call a Professional


With a little elbow grease and a few ordinary home materials, mold and mildew may be cleaned up in a very short period of time. Always remember to prioritize your own safety. Avoid taking on a task you’re not confident in unless you can accomplish it slowly and with lots of fresh air.


If mold and mildew are recurring problems, or if your mold and mildew problem is extremely severe, you should get expert help. Also, if you notice any water leaks or problems, call a plumber right once.

Eco-Friendly Painting: Everything You Need to Know

Eco-Friendly Painting: Everything You Need to Know

If you care about the environment or want to minimize the amount of chemicals in your home, you might think twice before buying regular paint from the home improvement store.

There are now more eco-friendly paint options available than ever before if you care about healthy indoor air quality.


Low- and Zero VOC Paints


Many produced goods include substances known as VOCs (volatile organic compounds). Long-term exposure to volatile organic compounds (VOCs) can have a detrimental effect on your health.


VOCs are a common ingredient in traditional paints because they keep the pigment from separating from the solution. A high-quality paint product is no longer required to include VOCs due to recent improvements in the industry.


When painting your home, look for paints with low or no volatile organic compounds (VOCs) to ensure that the air you breathe is as clean as possible.


In order to be considered low VOC, latex paints must contain less than 250 grams of VOC per liter.


  • Oil-based paints with less than 380 grams of VOCs per liter should be considered low-VOC.


VOC content should be less than 5 grams per liter for any latex or oil-based paint designated as zero VOC.


The Milk Paints


Have you ever considered using milk as a paintbrush instead of just a vessel to mix your cereal and coffee with? Instead of hazardous ingredients, milk paint employs a protein called casein to bind the paint solution and pigment together.


To be fair, the range of colors available in milk paint is somewhat limited, but you can greatly expand your palette by experimenting with different combinations of colors. When painting with milk paint, remember that it’s a powder that must be mixed into a solution before it can be used.


Natural Minerals, Plant Dyes, and Resins are used to make paint.


Plant-based materials, essential oils, minerals, and natural dyes make up these natural paints.


As long as you use a water-based natural paint, you won’t likely notice any odors during the painting process. Plant oils used in the solution may leave a scent on oil-based natural paints. As with milk paints, you’ll have to experiment a bit to get the color you want.


Primer with zero emissions of volatile organic compounds


Primer with no volatile organic compounds (VOCs) is as common as nontoxic paint. A solid primer lays the stage for a successful paint job. When painting on a primed surface, you can be sure that the paint will adhere to the wall, and that it will dry evenly and withstand normal wear and tear for years to come.


If you want to guarantee that your painting project is as ecologically friendly as possible, choose a zero-VOC primer and zero-VOC paint.


How to Paint Your Home in an Eco-Friendly Way


The practicality of the project must be considered once you’ve decided on the paint and primer you’ll use. How much paint are you going to use? How will you get rid of it if you have too much? It is not possible to dispose of zero- and low-VOC paints in the trash or flush them down the toilet.


Keep these four guidelines in mind while painting to reduce your environmental impact:


To save money, just buy what you really need.


A gallon of paint may not cover as much surface area as you thought it would since different surfaces absorb paint at different rates, making it difficult to estimate how much paint you’ll need.


A gallon of paint, on average, covers around 350 square feet of surface area.


Taking into account the fact that you may need to apply two coats of paint to cover any imperfections you may have made on the first coat is a good rule of thumb. Paint calculators may be found online and at your local hardware shop.


This information will be included in the estimate provided by a professional painter if you decide to hire one.


  1. Invest on high-quality materials (or borrow them).


Using high-quality brushes and rollers will make your painting seem better.


If you take care of your painting equipment (don’t allow the paint dry on the brushes or rollers, for example), you won’t have to buy new ones when your adolescent decides that the pink walls she requested as a five-year-old are no longer appropriate.


Preserve the paint you wish to keep in a safe place.


Maintaining a consistent temperature for paint is critical to its long-term viability. Keep the cans off the floor in a cold, dry place, such a closet or a basement that doesn’t have any moisture issues.


Make a plan for waste disposal.


Dispose of any paint that you don’t want to keep, or that has gone bad, in the proper manner. Hazardous waste disposal days and locations can be found in most towns and cities. If you have any usable leftovers, consider asking around to see if anyone knows of any community programs that might be interested in them.


Drying out and discarding small quantities of unused or damaged latex paint is one option.


Are you all set to start painting?


A new coat of paint is one of the most cost-effective and time-efficient home repair projects you can do. As technology improves, there is no need to sacrifice your environmental commitments in order to give your house a fresh new look.


To avoid damaging the environment, choose an eco-friendly paint, and follow the required procedures to complete the work.

How to Paint Outdoor Furniture


Are you as excited as I am about the arrival of spring?

As a native southerner, I look forward to snow and a reprieve from the summer’s oppressive heat and humidity. However, as soon as the forsythia begins to blossom, I’m eager for spring and warmer temperatures.


We had a taste of spring temps a few weeks ago, and that was all it took for me to start thinking about getting our home and patio ready for spring and summer. My hens now have their own run, and they’re no longer leaving surprises all over the patio. That, in my opinion, is my signal to get the patio furniture out of the garage and start putting up my outside sanctuary!


Patio furniture, particularly high-quality items, may be an expensive investment, so it’s well worth your time to look after it. Everyone isn’t perfect, however. Rainstorms that appear out of nowhere are not uncommon. Covers for furniture are blown off. Kids and dogs wreak havoc on furniture.


Fortunately, outdoor furniture is rather sturdy, and in most instances, a few coats of paint and an afternoon of elbow labor are all that is required to make your patio set ready for meals al fresco.


Are you ready to go? Please continue to read. The Best Pick Guarantee is offered by our businesses. Make a call now!


Metal Patio Furniture: How to Paint


Metal patio furniture may survive for decades if properly maintained, but it will rust and decay if not.


Preparing and painting metal furniture is similar to restoring an antique wrought iron fence, although it will take less time.


The following items will be required:


  • A tarp or drop cloth that is big enough to cover the whole area.


  • Brush (wire)


  • Towels available for purchase


  • Personal protective equipment (gloves, goggles, and mask)


  • An anti-rust agent


  • Primer to prevent rust


Spray paint for metal


Clean the furnishings in the first step.


If you attempt to paint over existing rust, your efforts will be short-lived. Scrape off as much rust as you can with the wire brush. Remember to clean the table’s bottom as well as the back sides of the chair legs.


After removing the rust, use the high-pressure setting on your hose nozzle to rinse each item of furniture. This will aid in the removal of any remaining rust particles. To completely dry each piece of furniture, use shop towels or old bath towels—this is critical since any moisture left on the exposed metal will immediately rust.


Seal the metal in the second step.


You may skip this step if you’re really rushed for time, but you’ll have to do it again next spring if you do.


Applying a rust converter to your metal outdoor furniture can help prevent any little spots of rust from spreading and spoiling your freshly painted surface. Choose from sprayable and paintable rust converters.


Rust converter clings to any rust patches you may have overlooked and converts it to iron tannate, a chemical substance. Iron tannate produces a protective barrier against the weather, rather than eroding away at the metal as rust does.


Step 3: Prepare the surface for painting by priming it and painting it.


You may theoretically omit the primer, much like the rust converter, but your paint will not weather as well.


What would I say to you? Spend some time priming your walls. No, it’s not as much fun as painting that wonderful color you choose, but unless you love preparing and painting metal furniture, it’s time well spent.


Choose a metal-specific primer and choose for the spray version to make your life simpler. With so much detailed design on most metal furniture, using a paint brush soon becomes a test of patience.


After the priming coat has dried, it’s time to start painting!


I usually go for spray formulas when painting my patio furniture. Most spray paint nozzles may be used at any angle, even upside down, making it much simpler to apply paint in tight or unusual spaces.


Because paint doesn’t seep into metal as it does wood, you’ll probably only need two or three light coats. Before putting your furniture out to your patio, carefully take everything to a covered area—ideally, a garage or similar location—and allow the paint to completely dry and cure.


Some pointers


  • To prevent a stronger application in one location, move the spray can over the furniture in even passes, starting and finishing on your tarp or drop cloth.


  • Don’t worry if the paint begins to flow since you were a bit rough with it. Take a pause, let the area to dry, then carefully sand off the drips with a piece of sandpaper.


  • If you’re going to work outdoors, make sure it’s a calm, windless day. You’d be surprised at how many bugs are buzzing about, and how little breeze it takes for them to settle on your newly painted furniture.


How to Restore and Restore Wooden Patio Furniture


When painting wood outdoor furniture, you won’t have to worry about rust, but it doesn’t mean you shouldn’t prepare and prime the surface. Surface preparation is essential for a good-looking, long-lasting finished product in any painting endeavor.


Gather the following items on a weekend when the weather is expected to be nice:


  • A tarp or drop cloth that is big enough to cover the whole area.


  • Washer with high pressure


  • Scraper or a putty knife


  • Sandpaper (medium grit)


  • Paint for the outside


  • Painting the outside


  • Paint brushes, foam brushes, and other painting tools


Clean the furnishings in the first step.


The first stage involves stripping each piece of furniture down to its bare wood. If your wood patio furniture has been exposed to the outdoors for a few seasons, the present finish is likely in poor condition and can simply peel off.


Use a putty knife or scraper to scrape away as much paint as possible from previously painted furniture.


Use sandpaper to rough up the surface and reveal a layer of raw wood if the pieces are stained (but not painted).


Use a power washer to remove any remaining paint or stain after you’ve removed as much as possible of the original finish (or if the furniture was never painted or stained and has simply aged).


The pressure washer will remove the top layer of aged wood, leaving you with a clean, level surface on which to paint.


Move on to the following stage when the pieces have fully dried.


Step 2: Prepare the surface for painting by priming it and painting it.


On wood outdoor furniture, don’t omit the priming coat. One of the most essential things you can do to preserve your furniture from degrading throughout the year is to apply this protective barrier against sunshine and moisture.


It’s up to you (and the intricacy of your furniture’s design) whether you use a paintbrush, a foam brush, a roller, or a spray can to apply priming and paint.


Because bare wood absorbs paint and primer, purchase a little extra of each. Before applying the next layer, make sure the previous one is completely dried.


Place your furniture in a garage or other enclosed place until the paint is completely dry and cured.


a few pointers


  • Pick up a couple of foam paint brushes while you’re buying materials. They’re great for getting primer and paint into tiny spaces like corners and niches.


  • Use a semigloss exterior paint to make spills and stains simpler to clean up.


  • Have you ever wondered why I didn’t suggest staining outdoor wood furniture? If you choose, you may stain and protect your wood patio furniture, but keep in mind that you’ll have to do it every year. Paint shields your work from harmful UV rays, extending the life of your efforts.


Plastic Patio Furniture: How to Paint It


Although conventional wisdom suggests against it, if you aren’t very connected to your plastic patio furniture and won’t be upset if the finish doesn’t survive for years, painting it could be worth a shot.


There are just a few items you’ll need:


  • A tarp or drop cloth that is big enough to cover the whole area.


  • Vinegar of white


  • Plastic spray paint


Clean the plastic in the first step.


Use the spray nozzle on your garden hose to rinse the furniture if it’s only dusty. Are you stumped as to how to clean mildew-infested plastic? For stubborn stains, use a damp cloth dipped in white vinegar.


Before painting, make sure each piece is completely dry.


Paint the second step.


This procedure necessitates the use of a spray paint designed exclusively for use on plastic. Allow the furniture to dry fully between layers and use a delicate touch while painting. Most experts say that one can of spray paint is plenty for a regular chair, with more for a big table or loveseat-style chair.


a few pointers


  • If your patio furniture is absolutely smooth and untextured, the paint may not adhere effectively, causing the finish to chip. Use an abrasive sponge or cleaning pad to rough up the surface before painting.


  • If you want to remove filth and stains, don’t use a bleach-based cleaning; it can degrade the plastic.


Finally,


Painting your patio set is a terrific way to liven up your outside area while also extending the life of your patio set.


Before you begin, prepare ahead and double-check that you have all of the necessary items. Choose a weekend with beautiful weather and unleash your inner Picasso! You’ll save money and have a vibrant patio to begin the spring season.